Lara McEvoy - 319311
Unit 13: Final Major Project
Production Processes: 2.1
Production process research is focussed on the process I should undertake to produce my documentary. Within this section I am going to be exploring how to create a short form documentary, detailing areas such as lighting, sound and camera, including practical research to inform my production. While looking at the more creative elements, I will also undertake research into documentary scripts and consent/ethics. Looking into these areas will give me time to prepare for production, understanding what I need to do to create an engaging short documentary.
How to create a short documentary
(04/03/24)
Seeing as I am creating a documentary for my final major project it is important for me to understand how I should create one. I have never made a documentary before, so some may say that this isn’t a wise decision, but here I am. This will be a challenge, of course, but a challenge I am willing to take on and exactly why this section of research is here. Hopefully this research will help inform the production process, giving me a better understanding of what I need to do and how to produce a documentary, specifically a short one.
Due to the timeframe given to produce this documentary, it is a sensible decision for me to create a short documentary. A full-length documentary is just unreasonable and if I were to try to do this, it would become a thing of quantity over quality, whereas I want quality over quantity. Because of this, I made the decision to look into how to create a mini/micro documentary ensuring I create something which is quality over quantity.
Mini documentaries are ideal to share a story when there is limited time and budget, or even no need for it. The length can vary between 2 – 25 minutes for it to be classes as a mini documentary. Dependent on who you ask, they may also be known as either a micro or mini doc. The most common use of a mini documentary is for either a non-profit organisation or businesses but they all centre around real stories. The way in which you would create a short documentary is very similar to how you would make full length documentary. Though the most important difference to remember is the fact of who you are creating the documentary for, is it for yourself or a client. For my documentary, I am creating it for myself even though its working alongside a client I have worked with in the past. In order to create a mini documentary, there are 6
steps/stages which need to be undertaken they are: define the goal of the film, research, script outline/project proposal, budget, production and post-production and final output.
Step 1 - Define the Goal
The first step to take when creating a short documentary is to define the goal, you need to have a clear understanding of what the objective is for the documentary. If working for a client, then it is important that you know what they want exactly otherwise you could end up producing a documentary that is no use to them, due to the lack of guidance. Though arguably, when working alone, this task can be just as difficult because you can have an idea but if the idea doesn’t have a definitive goal, then you cannot progress. From the research source I am using, they give a list of questions that you could give to a client to help with the understanding of the project, however this can be used even if you are creating the documentary for yourself.
Step 2 - Research
Now that the goal of the documentary is clear, you should undertake research into the given subject. Doing this gives you a chance to fully understand the subject, in detail, and start to figure out the best way to tell it. With some stories there may be concern of the topic being controversial or triggering for some people, so looking into this subject and how to best show it would be beneficial. Research is vital in building your own understanding of the subject and also what content should be included such as; who should be interviewed? What footage do you need? How long will it take to shoot etc. the logistics need to be considered as well as the creative aspects.
Within this stage, looking into existing examples is a good way to understand how others have portrayed the subject. This also means you can see what to do and certainly what not to do, but it’s important to remember that you shouldn’t copy existing work. The work needs to be individual and stand out not jst a copy of someone else’s work you have seen and liked.
Step 3 - Script Outline
Scripts are an essential element of all media productions, and with a documentary it is a smart idea to have one as it helps to keep the process moving slowly.
For a documentary you would use a documentary script choosing either one of three formats: a treatment, a split script or a paper edit.
-
A treatment is a hypothetical pre-shoot narrative document which describes what’s going to happen from start to finish, it allows the filmmakers to plan what content to collect as well as the interviews these visuals would go with. With this style of script, the final film doesn’t often fully follow the original ideas from the treatment.
-
A split script is a side-by-side two column document where one side is stating what the audience will see and the other side stating what will be heard at the same time. This style of script is more useful when it comes to post-production as it acts as a blueprint that the editor can then follow. To go with this, this style is useful when you are unsure on what the interviewee is going to say during the interviews, you may have a rough idea but during the pre-production stage the answers are likely to be unknown.
-
The paper edit is a detailed account of visuals along with the precise sounds that will go with what was recorded during the interviews, essentially this is a more detailed account of what happens, compared to the treatment and split script. This style of script is typically written and used towards the end of the production process, after the interviews have been undertaken, b-roll has been filmed etc.
For my documentary, I feel as though a split script is the best for the pre-production stage. However, a treatment would allow me to understand the narrative with more ease and then write a split-script afterwards. But this is something I need to look into during the problem-solving stage with more detail.
To the right is an example of the split script style, which was created in Unit 7. In this I watched a documentary (Louis Theroux Interviews) and then wrote down the script from what I was seeing and hearing. Doing this allowed me to understand the basic format for a Split script and put into practice what I learnt.

Step 4 - Budget
As this is a college production, the budget is non-existent. If I were creating this for a client, then there would be a budget and it’s important to understand that you should work within that budget. With this, you should create a contingency line (about 8-10% of the budget) so that there is a safety net just in case.
As I am working without a budget, it’s important that I understand what needs to be done and not done, meaning I don’t have to undertake any unwanted expenses.
Step 5 - Pre-production + Production
Before going into the production stage, it’s important to make sure that all necessary pre-production paperwork. With a documentary, the primary concern is consent as you need to make sure anyone seen within the documentary has given consent and are happy to be filmed. If you are creating a very specific documentary then you will know who’s in it and the consent needed, however if you are creating one where there are lots of people within a narrative then it can become quite tricky. Also, it’s important to understand what kit you need to use, meaning production to be undertaken swiftly, with knowledge of the kit. Once consent has been given, interviews have been arranged, location + risk assessments completed etc. then you can move into production.
For my documentary there are issues regarding consent due to who I want to film, so I made the decision to explore this in more depth in problem solving. Click the button below to go there.
Step 6 - Post-production
Within this stage you should start off by re-writing the script so that it fits with the footage you have gotten, this isn’t necessary to do but it's recommended if there are any drastic changes that happen in production. Then you log the footage and write up a rough transcript of the interviews, giving you a chance to review what was said in the interviews and understand what footage you were able to capture. From this you can then make a start with the editing, but there are some techniques that are conventional to use within documentaries. They are:
-
Use jump cuts to b-roll or archive in interviews when you need to cut out certain areas of dialogue. This is a more common technique as it allows for the editor to cut out unnecessary dialogue such as pauses and ‘uhhhh’s.
-
Cutting on Action – this is where a cut happens as a subject moves by either looking away from the camera or shifts in their seat. This editing technique allows for more visual variety, without the need for b-roll or archival footage. It’s a simple but effective technique.
-
J-cut or L-cut – a J-cut leads into a clip through playing the audio for the next clip before the clip is shown, whereas an L-cut is where the audio from the previous clip keeps playing as it changes to the next shot. This technique is used all the time within television, so one that goes unnoticed due to how conventional it is.
-
Keep graphics simple – with a documentary, you want the audience to be focused on the narrative but sometimes the use of graphics such as lower thirds helps to aid this. These graphics need to be simple but get the information across that’s needed.
-
Ken Burns effect (looked at in Unit 12) – there are times where you won’t have footage to put in place so, what Ken Burns did was to use photos in place of missing footage. The photo shouldn’t just be placed on the screen as that’s just visually uninteresting, they should either zoom or pan to keep it visually interesting.
-
Music – using music helps to both set the tone and pace of the documentary. It also helps to emphasize the mood of the piece, allowing the audiences emotional response to be guided and help with the preferred reading.
Seeing as my documentary is focused on a dance show, there is a high chance that classic music will be heard in some shots, so I will either have to look to see how I can use it without copyright issues or mute the clips if the music isn’t suitable.
Harvard referencing -
• Desktop-Documentaries.com. (2008). What is a Mini Documentary and How Do You Make One? [online] Available at: https://www.desktop-documentaries.com/mini-documentary.html.
• Documentary Film Cameras. (2018). What does a documentary script look like? How to write a script for a documentary film - Documentary Film Cameras. [online] Available at: https://documentarycameras.com/how-to-write-a-documentary-film-script/.
In all honesty, the start of this research was useful but after step 1, it was mostly information I knew. Looking into how to define a goal was something that I know I need to work on and explore more within the problem-solving section, learning about what I want the goal of my documentary to be and working it out. From defining the goal, I can work backwards and figure out what I want the story to be from there. As I have decided on using the observational mode, I know that the goal isn’t going to be 100% set, but if I can set a goal of what the three pupils are talking about then I can work it out.
Sections 2 – 5 was knowledge I already had, there wasn’t necessarily any specific information I learnt about how to create a short documentary, it was more of a refresher. I understand that this means the research doesn’t have much value and could’ve been a waste of time, but I wouldn’t have known this unless I did the research. So, there are areas I have learnt information such as the editing techniques, which allowed me to see what basic, but useful, techniques I could use.
Within the next section, I am going to be exploring the use of sound in interviews. Sound is an essential element of any media production, so by exploring sound in documentaries with more detail I will hopefully develop a deeper understanding, and implement this within my documentary.
Sound in interviews
(04/03/23)
Here I have decided to explore how best to record sound within my interviews. I chose to look into shotgun and radio microphones, as well as tips on how to best record audio for interviews. Though this research may be basic, it will help with my own understanding of what the best way to record audio is and how I can get the best out of the interviews. The first area I researched was the shotgun and radio microphones.
Shotgun and Radio Microphones -
Seeing as interviews are what make up the narration of my piece, it’s important that I understand the best way for me to record the audio for my piece. There are two main mic systems I could use to record the interviews; these are either radio mics or a shotgun mic.

The shotgun mic is better for picking up direct sound, so within an interview the shotgun would likely be rigged onto the camera or attached to a boom pole with a sound recorder. Doing this would allow for the sound picked up to be direct and capture what the subject is saying with ease, also it’s good for isolating the sound/minimizing background noise. However, the downside of using the shotgun is that there’s a chance you need someone to hold it on a boom pole, in order to get the most clear and direct sound, but because of how long interviews can last this doesn’t sound like a very viable option. Also, it’s worth a mentioning I am a one-man crew, at this moment in time, so a shotgun isn’t likely to be what I chose to use.
The radio mics are good at picking up sound from a subject, due to the fact that the microphone is attached to the subject. Though the radio mics have a larger polar pattern (how directional the microphone is) they are still able to pick up direct sound, but there’s less chance of background noise being minimized. With this as a factor, it’s not the end of the world as there is editing software, I can use to take out the background noise, such as Adobe Audition or effects in Premier Pro. The main benefit of using a radio mic, in comparison to a shotgun mic, is that you can attach them to the camera with ease as they use a receiver and transmitter so there isn’t a need for anyone to be holding a boom pole.

When researching the microphones, I came across a range of websites that had tips on how to record sound, below I have noted the ones which I felt were more important, and ones that I could use in my recording.
Sound tips -
-
Use gaffer tape to hide radio mics – if you don’t want the radio mics to be seen in shot, creating the illusion that you are using a shotgun mic, then you can use gaff tape to do so. You should fold the tape into a small triangle and attached the top of the microphone to one side of the tape, making sure that you avoid the head of the mic. This allows for the mic to still pick up the audio but be hidden from the camera.
-
Use two microphones – it’s important to never rely on one source of audio, having a backup is critical. This means that if there is any interruption with one of the mics then there is a backup so that you can cut to the other source instead. Also, this makes it easier to sync the audio to the in post-production. The best way to do this would have a radio mic attached to the camera and a shotgun mic out of the frame from above, which requires a boom pole rig.
-
Record room noise/atmospherics – before starting the interview make sure to record the atmosphere of the room. Doing this means that you can use this in post-production to edit out other unwanted sounds.
-
Use a blanket – if the location of recording has hardwood floors, there is a high chance the audio will come out more echoey. So, throwing a blanket on the floor/walls will help to dampen the sound.
-
Always wear headphones – throughout the entirety of the shoot, it’s important to wear headphones so that you can monitor the sound levels with more ease. Along with this, before the interview is conducted do a test shot with the subject saying, ‘testing 1, 2, 3’, so that you can figure out how the audio will sound. Without listening to the audio while recording, it’s like filming without looking at the viewfinder, it’s pointless, so making sure you are wearing headphones is essential.
Harvard referencing -
• Desktop-Documentaries.com. (2008). What is a Mini Documentary and How Do You Make One? [online] Available at: https://www.desktop-documentaries.com/mini-documentary.html.
• Documentary Film Cameras. (2018). What does a documentary script look like? How to write a script for a documentary film - Documentary Film Cameras. [online] Available at: https://documentarycameras.com/how-to-write-a-documentary-film-script/.
Looking into sound has made me realise that I will need to undertake practical research for me to make a decision on what microphone is best for interviews. This research has given me a basic understanding of what the two mic systems are and what I can do to ensure I record the best possible audio quality I can. As I have explored sound, its only right I explore lighting in interviews too as I need to know how to light up the interviews appropriately for the mood I want to create.
Interview lighting
(01/03/23)
Lighting is an essential element of any media production, however in documentaries it plays a very important role. This is because the lighting within the interviews is an element that creates the mood so making sure this is done correctly is important. Below I have looked into three-point lighting and the Rembrandt lighting technique. These two techniques are simple but effective, if done well. First, I looked at three-point lighting.
Three-point lighting -
The conventional lighting technique used within an interview is three-point lighting. As the name suggests, it involves using three light sources placed in different positions, but the distance, intensity and size all help in creating different moods. With three-point lighting the three light sources are:
• Key light – primary lighting point
• Fill light – used to fill opposite the key light
• Backlight – used at the back to bring the subject out of the background
With three-point lighting, it deals with the relationship each light has with one another, also known as the light intensity ratio. Usually, this ration is 2:1. What this means is that the key light should be twice as bright as the fill light. Dependent on the goals of the lighting, the relationship of intensity and placement can be changed to give a more cinematic look for documentary interviews. The use of this ratio can be played around with, such as if you were to be filming a more corporate video you could use 1.5:1 to give a more inviting feel, however anything below 1.5 would make the image look too flat and have no use of dimension.
Through placing these light sources in the set places, it allows for a three-dimensional look, illuminating a separate area of the subject, creating an image with more depth. Below I have and image which shows where the lights should be set up, then I have explained how the three lighting sources work in more detail.

Key Light -
This is the primary land brightest light source out of the three. As shown in the image above, the key light is typically positioned slightly off to the side of the camera and front of the subject at a 45-degree angle. It creates a shadow on the opposite side of the subject's face, giving dimension and depth. The light also helps create the mood of a scene, dependent on the final lighting placement, it can either create a more high-key image (softer, evenly lit and more upbeat) or a low-key image (high contrasts, deeper shadows and moodier).
Fill Light -
The fill light should be mirroring the key light on the other side of the camera. This lighting source does as it says, it fills in the shadows that the key light creates on the subject, bringing more details forward. Typically, this lighting source isn’t as bright as the key light, which allows for the mood to be created by either dimming or lightening it. If the fill is dim, it creates a high-contrast image, with a more film-noir style of shadow, whereas a brighter light with a lower more balanced levels give a more even look. Sometimes, this light isn’t even a light, it can be a reflector, bounce card, a wall, essentially anything that bounces light back onto the subject and fills in the shadows. The use of this light and the key light determine the mood of the interview.
Backlight -
The third source, known as the backlight, shines from behind the subject (as shown in the image above), completing the setup. This helps to create a rim of light around the head, separating the subject from the background creating more depth. In more professional productions, this light is hung above, high enough so it's out of frame, opposite the key light pointing at the back of the subject's neck. If you are unable to hang the backlight, then it should be positioned just out of frame but still behind the subject.
Rembrandt lighting -
The Rembrandt lighting technique is commonly used in photography; however, cinematographers use it as it’s a way to attain dramatic lighting with minimal equipment. This technique uses one light and a reflector or two separate lights. It's so popular because it creates a look which is dramatic but so natural at the same time. The lights should create a small triangle under the subject's eye, known as the Rembrandt triangle. Before going into too much detail, I looked into the basic history of the Rembrandt lighting technique.

This technique originated from the famous Dutch painter, Rembrandt, who introduced the art world to his form of lighting the subjects he painted. He even used this technique in his own self portrait where there is a small triangle under his left eye, this is shown in the image to the left. Though this is Rembrandts technique, he didn’t claim it as his own, a film director Cecil B. DeMille claimed it in 1915 when filming The Warrens of Virginia as he borrowed portable lights to create shadows in his shots to imitate ones made in nature. Luckily for Rembrandt, DeMille named the technique ‘Rembrandt lighting’. As this lighting technique became so popular among filmmakers, it got associated with the film noir genre.
Now that I have a brief understanding of the history, I can look into how to utilise this technique with more ease.
The triangle shouldn’t be any wider than the subjects and longer than the nose, however this is up to interpretation as many filmmakers alter this rule to their liking. For photography the best days for this effect to be created is cloudy days, and by placing the subject closer or further from the light source controls the amount of light shown. An example of this lighting is shown below. This example is a more dramatic use of the technique; however, it displays it very well for photography. The triangle is placed under the right eye highlighting that area of the
face but leaving the rest in the shadows. For a film or documentary this technique can add in a more dramatic effect and help create the mood. Using this allows for the audience to understand the mood with more ease, though it’s such a simple feature it has a larger effect that you would think.

gvmled.com. (2022). Rembrandt-style lighting, depicting characters with light - GVM Official Site. [online] Available at: https://gvmled.com/rembrandt-style-lighting-depicting-characters-with-light/.

The image shown on the left is the basic setup to help create the Rembrandt lighting effect. There are 3 stages in setting up this technique, stage your camera, position your key light and position your reflector. In stage 1 you should establish the position of the subject and the camera, in the example shown on the left the camera is facing the subject straight on, but this doesn’t have to be the case the camera + subject can be positioned wherever the filmmaker pleases. Stage 2, this is where you position the key light, but it needs to be positioned above the subject not at eye level. After this you would want to angle the light between 50-60 degrees to one side, looking to see if there is the triangle under the eyes, if not then move it accordingly until the triangle can be seen. Finally stage 3,
place the reflector on the other side of the subject (the opposite side to the light) around 3-4 feet away at a 45-degree angle. This just helps to soften the shadows on the other side, if you are wanting these shadows then don’t use the reflector.
Harvard referencing -
• Bedard, M. (2020). Rembrandt Lighting Anyone Can Do. [online] StudioBinder. Available at: https://www.studiobinder.com/blog/rembrandt-lighting-photography/.
Through looking into both three-point lighting and the Rembrandt lighting, I have been able to explore 2 simple yet effective techniques. Three-point lighting is the basic setup, allowing me to experiment with it and see how I can work with natural light as my key light and what other sources can aid the setup. The Rembrandt lighting is as simple as three-point lighting, however from looking into it, for my documentary idea I don’t think that this is a technique I am going to use. I feel as though it would create too much of a dramatic effect which isn’t what I am looking to go for.
In the next section, I have decided to undertake a more practical element of research by putting the sound and lighting research shown above into action through filming a test interview. This will allow me to explore the different interview styles I want to use, allowing me to see if the one I want to use and if it will realistically work. While this is putting the research from the section above into play, this is a valuable chance for me to remind myself of how the kit works and make sure I am 100% confident using this kit.
Practical Research
Primary
(01/03/23 - 04/03/24)
Lighting + Sound Practice -
Before setting up the lighting, you need to understand what you want the lighting to achieve and why you want it. It’s important to remember that lighting always has purpose, it’s not just done randomly. Where the light source is coming from needs to make sense based on the environment and where the subject is within this. From this, thinking about the size and distance of the lighting source is important for creating mood. The size and distance will determine how hard or soft the lighting will come off, in a studio setting a method of diffusion would be used in order to make the light softer. Diffusion is where you place a sheet or filter of some sort between the light source and the object, which diffuses the rays of hard light to softer light.
From the research undertaken, both the research shown above and the research in my content section, I decided to undertake a more practical element and explore how to light the interview style I am wanting to go for.
The first area of lighting I explored was three-point lighting. I worked with a couple other people within my class to work on interview lighting + styles, as they were also wanting to explore it. The image below was the original setup for the three-point lighting multi-cam interview. Within this setup there is a key light, fill light and backlight. The key light is to the right of the camera, giving light to the right of the subject's face and the fill light is to the left of the camera, allowing for the shadows to be eliminated. The backlight is allowing for the back of the subject to be seen with more ease and bring them out of the background. For me personally, I'm unsure if I want to work on multi-cam interview so I didn’t get much footage from this

However, I was able to get a short shot which I quite like the feel of. The shot can be seen below.
In this I have used a pink backlight just to see if it would work, and I have used more of a long shot. I think for now we ignore the pink light as that was just put there to try something new, but I don’t think it will work. Moving on the feel of this shot is more casual which is the atmosphere I want these interviews to have. I want these interviews to be more casual and laid back, learning about these people involved, it needs to be a change of atmosphere from the dance show aspect of the documentary.
Seeing as I wasn’t able to get the practical research done, I wanted to during class, I decided that it would be a good idea to take the kit home and set up there instead. This is because I would be filming these interviews in either the pupils' bedrooms or homes so by practicing within a similar environment, I feel this will be a lot more beneficial.
3/3/24
Sunday was a useful day in terms of practical research. I was able to work with the natural light and work around eliminating shadows as best I could. To start with I tried doing a multi-cam setup which did work, as I was able to have a more mid-shot as the main shot and then a close up on a different angle, giving me a secondary shot to cut to. By using a secondary shot, it helps with the visual variety for the audience as sometimes interviews with one shot can be quite boring for them watching, especially when there's no actuality or archival footage just one shot of someone sat down. So having a second angle/shot gives the editor something to cut to, creating a more visually engaging interview for the audience to watch.
Below are some images of the process, as well as the initial edit of the two-shot interview. I found that editing it together helped me to understand how it would look visually.


Interview without music
Interview with music
Though I don’t like the formal feel of these edits, I do like the use of a second camera/angle on it as I've mentioned before, its more visual variety for the audience and for myself when it comes to post-production. The edit with music, the use of a second shot allows for a change to happen on certain beats of the music and keep a steady pace, something I could explore further later on. Also it's important to note how music has an effect on the mood of the video, by simply adding in a track it changes how the audience perceive the video and the message it has.
As I have mentioned above, diffusion is a useful tool to use and its simple but effective, which is something I used when filming to make the light softer. As I didn’t have a shower curtain, I decided to use a pillowcase and pop it around the light to create a softer look. The look I am wanting to attain for these interviews is a softer and calmer look, so the use of a diffuser allows for this to be achieved with a lot more ease.
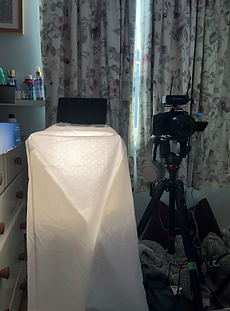
From editing the video, I wasn’t as happy as I thought I would be with the feel of the interview. So, Jon and I moved the camera around and we were able to set up a simple one camera shot, which is what I was picturing in my head but just couldn’t seem to get it to work when setting the camera up myself. I really like the simplicity of this shot, I feel that its more effective having a simple shot than a complex one, especially with the nature of my documentary. I could incorporate a second camera, but maybe work with a handheld camera instead, capturing more intimate shots and giving a more raw and authentic feel to the doc. The video can be seen below with an image of the set up.
One camera interview test

Title section practice -
For my introduction I am wanting to have my title appear behind the curtains as they either open or close. So, I made the decision to try and practice this as primary research now, so that when it comes to the postproduction stage I know how to prepare.
To do this I found some stock footage of some curtains opening with a black background, giving myself a blank template to work with. For the title to appear as the curtains open it meant I had to work with keyframes and masks, something I have previously done in Unit 09, but I decided I needed a reminder on how to do this, and to check if this were what I would want my title intro to look like.


The first step was to use the text tool to type, in the desired font, the title ‘Behind the Curtain’ and create it on its own layer, positioned above the stock footage. From this I created a rectangle mask, shown in the image to the right, which will allow me to change what part of the text is shown through different key frames. From this I went on to place the initial keyframe which would then allow me to go frame by frame and reveal more of the title as the curtains slowly open. The video can be seen below.
This took me around 30-45 minutes to do, so this is a factor I will need to consider when it comes to post-production, how much time am I willing to spend on a title segment which the audience aren’t likely to pay much attention to. While I consider this as factor, this title segment is something I would like to create, obviously with a lot more care and detail than the example shown above, as I feel it shows my editing skills rather than the basic cutting and trimming of clips. Along with this, it gives more context to the narrative from the start because if it were to just slowly fade onto screen it would tell the audience the title, of course, but I want it to be slowly revealed so the audience can understand the context of it as well. It isn’t set in stone I will use this, but from undertaking this practical research I feel this is an element I want to include that is worth the extra time and effort.
Undertaking this practical research taught me that for my interviews, I don’t want to go for the more classical style, I want it to feel more casual and relaxed. To do this the camera angles need to be more minimal and not too intense, such as a close up/extreme close up, I also need to make the lighting softer, through diffusion, to help create this mood. With the audio, I feel a radio mic is the best choice for me because it has much clearer audio and I will be able to film at the same time, so have a handheld camera as well as the static one. Overall, the practical element of the research has really helped me to understand what I need to do to create the mood I want and understand what I should avoid so it doesn’t become too formal.